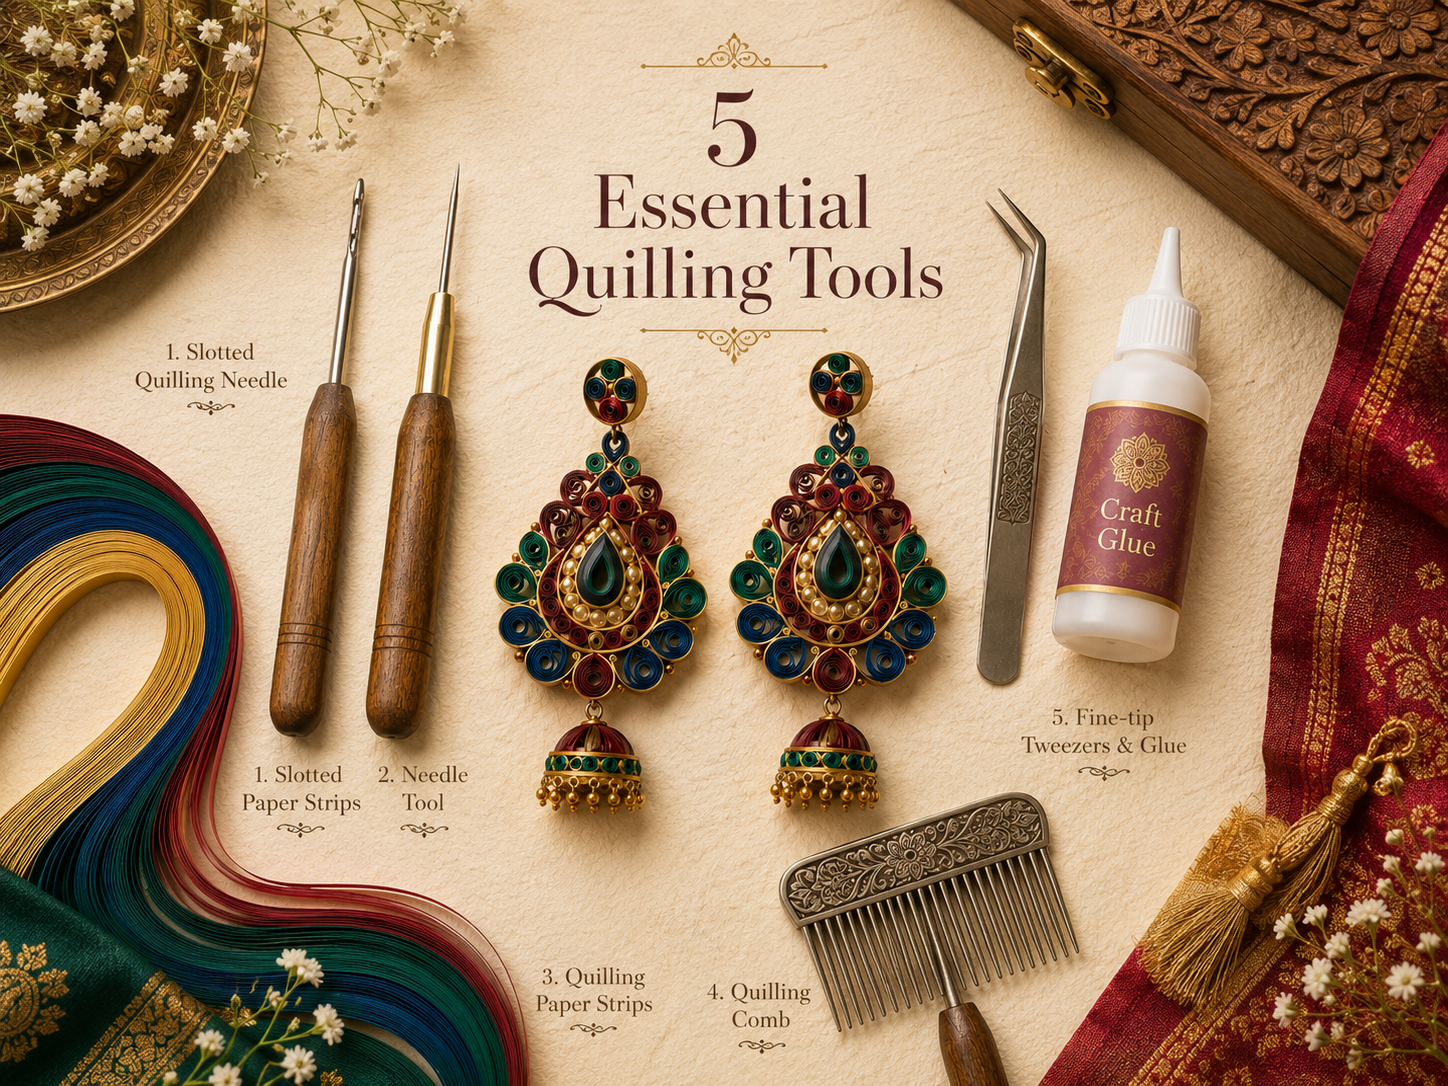
5 Essential Quilling Tools Every Earring Maker Needs
Because great earrings don't just happen — they're rolled, shaped, and crafted with the right tools in hand.
There's something almost magical about transforming a thin strip of paper into a pair of earrings that makes people stop and ask, "Wait — is that paper?!" That's the quiet power of quilling. It's an art form that has been around for centuries, and yet, every time it shows up in a new pair of handcrafted earrings, it feels completely fresh, completely alive.
But here's the truth that every quilling artist learns early on: the magic doesn't come from thin air. It comes from your tools.
Whether you're just starting your quilling journey or you've been rolling coils for years, having the right set of tools doesn't just make the process easier — it makes your work better. Cleaner coils. More precise shapes. Stronger finished pieces. Earrings you'll be proud to wear and proud to sell.
At Chhondo, we believe that every earring tells a story — and the tools you use are the first chapter of that story. So let's talk about the five essential quilling tools that every earring maker truly needs.
1. The Slotted Quilling Needle — Your Most Loyal Companion
If quilling has a hero tool, it's the slotted quilling needle. This is the tool you'll reach for first, use the most, and never want to work without.
A slotted quilling needle is a thin metal pin with a small slot at the tip. You slide the end of your paper strip into the slot and roll — and just like that, a perfect coil begins to form. The slot holds the paper in place so you can roll with confidence, without the strip slipping or curling unevenly.
For earring making specifically, you'll want to pay attention to needle width. Thinner needles create tight, dense coils ideal for intricate earring components. Thicker needles give you looser, more open coils that add a light, airy feel to your designs.
Pro tip: If you're making earrings for festivals or weddings — think Durga Puja collections or bridal accessories — go for a finer needle to achieve the detailed, jewellery-like look that elevates paper into something precious.
One small thing to keep in mind: slotted needles leave a tiny hole at the centre of your coil. For most earring designs, this is barely noticeable, especially once the piece is lacquered or glued. But if you want a truly seamless centre, explore the needle tool next.
2. The Needle Tool — For Precision and Perfection
Think of the needle tool as the slotted needle's more refined sibling. Instead of a slot, this tool has a smooth, pointed tip. You wrap your paper strip around the tip — rather than through it — and roll manually.
The result? Coils with no hole in the centre. Clean. Perfect. Gallery-worthy.
For earring making, the needle tool is especially valuable when crafting tight teardrop shapes, marquise coils, or the fine decorative elements that make a pair of earrings look truly handcrafted and high-end. It takes a little more practice than the slotted needle, but once you find your rhythm, you'll wonder how you ever worked without it.
This tool also gives you superior control over coil tightness. Roll gently, and you get a loose, flowing coil. Roll firmly, and you create a dense, structured shape — perfect for the sturdier base components of statement earrings.
At Chhondo, when we design earrings meant to look like miniature works of art, the needle tool almost always plays a central role. It's the difference between "pretty" and "extraordinary."
3. Quilling Paper Strips — The Soul of Every Design
Technically, quilling paper strips are your material, not your tool — but no list of essentials would be complete without them, because the quality of your paper strips functions as a tool in itself. The wrong paper can undo even the most skillful rolling.
For earring making, here's what matters most:
Width: Most earring components use 3mm or 5mm strips. Narrower strips create delicate, lightweight coils that sit beautifully on the ear. Wider strips give you volume and presence for bolder, more dramatic designs.
Weight: Paper that is too thin tears easily and loses shape over time. Paper that is too thick becomes difficult to roll and can look stiff rather than graceful. Look for quilling paper in the 80–120 gsm range for earrings — strong enough to hold shape, light enough to roll with ease.
Colour: For the Indian market, rich jewel tones — deep reds, emerald greens, royal blues, and warm golds — tend to resonate beautifully with festive and traditional aesthetics. Metallic-edged quilling paper adds an especially luxurious touch to earrings designed for occasions like Eid, Diwali, or weddings.
Coating and finish: Pre-coated or wax-coated paper strips are more resistant to humidity — an important factor in a country like India where monsoon season is very real and very hard on paper jewellery.
Invest in good paper, and every other tool in your collection works better.
4. Quilling Comb — The Secret to Structural Beauty
Here is the tool that separates basic quilling from breathtaking quilling: the quilling comb.
A quilling comb looks exactly like a small hair comb — a row of evenly spaced prongs on a handle. By weaving paper strips between these prongs in various patterns, you can create shapes that a rolling needle simply cannot produce: intricate lattice designs, layered petal structures, symmetrical geometric forms, and looping teardrop chains.
For earrings, the quilling comb opens up a completely different dimension of design. Imagine chandelier-style earrings with cascading loops, or geometric drops with clean, even spacing that looks almost laser-cut. These are the designs that make customers look twice and ask "How did you make this?"
Working with a comb requires patience — but the learning curve is entirely worth it. Once you understand how the prongs work as guides for your paper, you'll find yourself designing earring shapes you never thought possible with just paper and glue.
At Chhondo, some of our most admired earring collections owe their structure entirely to the humble quilling comb. It's a tool that rewards every hour you invest in it.
5. Tweezers and Fine-Tip Glue Applicator — The Detail Duo
We're counting these as one essential because, in practice, they work as a pair — and together, they are responsible for the difference between an earring that looks handmade and one that looks handcrafted.
Tweezers: Fine-tipped tweezers allow you to place tiny coils and shapes with precision that your fingers simply cannot achieve. When you're assembling an earring that might have fifteen or twenty individual components, tweezers let you position each piece exactly where it needs to go, hold it steady while the glue sets, and make micro-adjustments that completely change the final look. Curved-tip tweezers are especially useful for picking up and placing delicate shapes without distorting them.
Fine-tip glue applicator: Excess glue is the enemy of beautiful quilled earrings. A fine-tip applicator — essentially a bottle with a precision nozzle — lets you apply the tiniest amount of glue exactly where you need it, with no smearing, no blobs, and no accidental flattening of coils. For earring making, PVA glue (white craft glue) is the standard, applied in small amounts and allowed to dry clear.
Used together, tweezers and a fine-tip glue applicator give your earrings a professional, finished quality that customers notice and appreciate.
Before You Go: A Note on Finishing
Once your earrings are assembled, always finish them with a coat of quilling lacquer or a clear sealant. This protects the paper from moisture, gives the earrings a gentle sheen, and significantly extends their life. In a humid climate like most of India, this step isn't optional — it's essential.
Pair your sealed quilling components with good-quality earring hooks and jump rings, and you have a pair of earrings that are not only beautiful but durable enough to be worn with confidence.
Final Thoughts
Quilling is an art form that rewards patience, precision, and the right tools. With a slotted quilling needle, a needle tool, quality paper strips, a quilling comb, and the detail duo of tweezers and a fine-tip glue applicator, you have everything you need to craft earrings that are genuinely extraordinary.
These aren't just tools. They are the foundation of every coil you roll, every shape you form, and every pair of earrings that leaves your hands and finds its way into someone's heart.
At Chhondo, we celebrate this craft — and we celebrate every maker who picks up a strip of paper and decides to create something beautiful.
Happy rolling!
Frequently Asked Questions
Q1. What is the best quilling needle for beginners making earrings?
For beginners, a slotted quilling needle is the easiest to start with. The slot holds the paper strip in place, making it much simpler to roll consistent coils. Start with a medium-width needle and experiment with thinner ones as your confidence grows.
Q2. Can I use regular craft paper instead of quilling paper strips for earrings?
You can, but it's not ideal. Quilling paper strips are cut to precise, uniform widths and are specially made to roll smoothly and hold shape. Regular craft paper often tears unevenly, is harder to roll, and may not produce the clean, consistent coils that make earrings look polished and professional.